 Visit Manager
Preproduction and data preservation
Version 1.0.0 starts preproduction. Existing accounts, visits, recorded times, settings and history are retained during upgrades. No re-entry or re-import is needed for this version. Each release requires a backup and data-preservation verification; an upgrade that fails this check is not approved.
Quick start
Your first route in six steps.
- Sign in. Use your personal credentials and choose your language.
- Set up My account. Save your places, working days and lunch break.
- Add accounts. Create a few records or preview a CSV import, then verify addresses.
- Calculate a proposal. In Plan my routes, choose the period and average visit duration.
- Review and transfer. Check journeys and the return before confirming calendar insertion.
- In the field, open My route. Read the next suggested visit and record your report.
Understand the workflow
An account is a customer or professional you want to visit. Your portfolio is the list of these accounts. A tour combines one day’s appointments and journeys.
A simulation is a proposal to review. Your validated calendar contains the appointments you have chosen to keep.
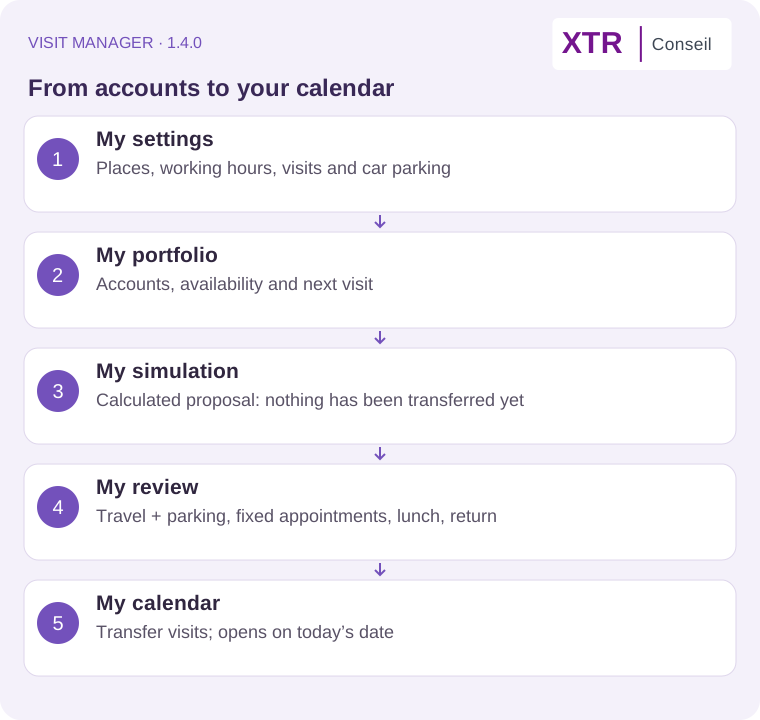
Remember: calculating a simulation does not automatically fill your calendar. You must transfer the appointments you want to keep.
Sign in and find your way
Use the credentials provided to you; no “Private beta” banner is displayed.
- Open https://visit-manager.fr and enter your workspace.
- Enter your email address and password. If you received a temporary password, follow the request to replace it.
- Select FR or EN for your language.
- On a phone, open Menu to switch sections.
The main sections are:
- My account: your places, hours and settings. Open it using your initials at the top right.
- My portfolio: records of the professionals you visit.
- Plan my tours: prepare a proposed schedule.
- My calendar: view retained appointments and record their outcomes.
- My map: locate accounts, places and tours.
- History and visits: find previous visits and reports.
Forgotten your password? Use the link on the sign-in page, then contact the administrator for the required code. Do not create a second account. On a shared device, finish by signing out.
Available in 1.3.0: the portfolio displays 50 accounts per page. Use Previous accounts / Next accounts. Search and filters cover the entire portfolio; changing filters or sorting returns to the first page. Checked accounts remain selected across pages. Select filtered accounts selects all eligible matches, including other pages.
Choose your avatar
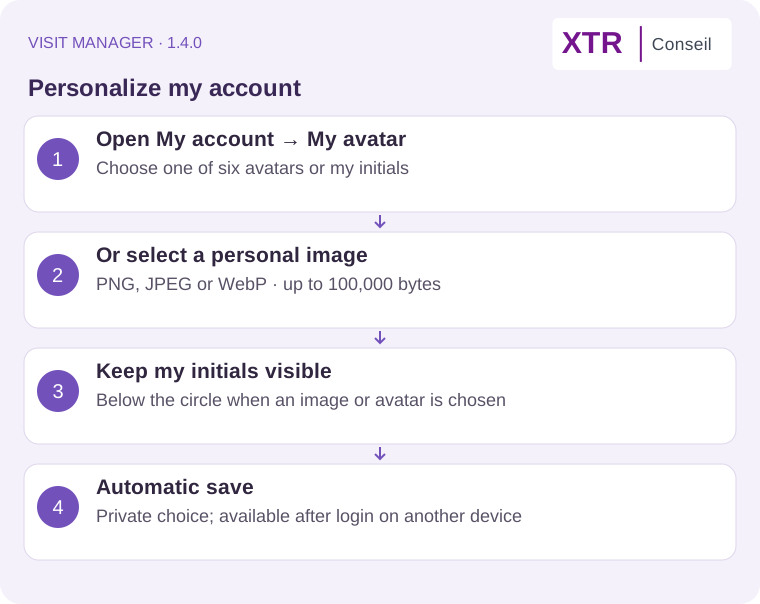
In My account → My avatar, choose a suggested avatar, your initials, or a PNG/JPEG/WebP image up to 100,000 bytes and 4,096 pixels per side. The choice saves automatically. With an avatar or photo, initials appear below the circle; in initials mode they appear inside it. Your image is private and included in personal backups.
Set up your places and hours
Do this before your first simulation.
- Open My account.
- Enter your home location, then add an office or other regular places if needed.
- Type part of each address and select a suggestion. On a phone, one tap is enough.
- Check the street number, postcode and town. Add building or access details yourself.
- Choose your field days, working hours, lunch break and departure/return places.
- Enter your usual visit duration, then select Save my locations and settings.
Manage your places
Places appear in a list. Select New place to add a record. Double-click a row or use View details, especially on a phone, to read the record. Then select Edit to change its information. Close details collapses the record; your edits remain in the draft.
To remove a place, select Delete and confirm. Apply the change with Save my locations and settings. The main home location is required and can be edited. If a place is used for departure, return, lunch or a fixed appointment, first choose another place in the relevant settings or day. Calendar archives retain their contents.
Open the Departure location and Return location lists and choose a place by name and address. These choices are available in default settings and day details. New places appear in the lists while editing; save the settings to apply them.
Example: leave at 09:00, allow 45 minutes per visit, take lunch from 12:30 to 13:30 and aim to return by 18:00.
A draft may retain your typing, but you must use the save button to apply the settings. If you change hours after preparing tours, read the message shown: some days may need recalculating. Confirmed appointments are protected.
Allow time to find parking
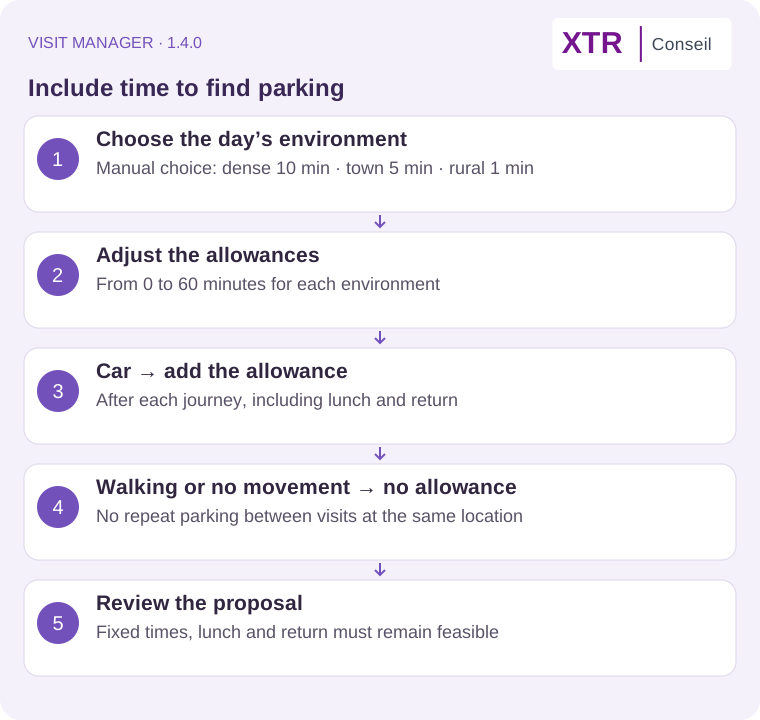
In your regular schedule settings, choose the day’s parking environment: dense urban area: 10 min, medium-sized town: 5 min (initial selection), or rural: 1 min. Each allowance is editable from 0 to 60 minutes. You can override these settings for a day. This is a manual choice for the entire day, not an automatic address classification.
The allowance applies only to car journeys, at each arrival after travelling, including lunch and return. It is not repeated between consecutive visits at the same location. It affects available capacity, fixed appointment feasibility and return time, but not mileage. Travel totals include parking; its share is shown in the calendar and ICS/PDF exports.
A parking-only profile edit preserves appointments and marks future routes for recalculation. A daily edit rechecks travel without moving visits. If the allowance makes the route impossible, correct the schedule or generate a new proposal.
Add and find accounts
Create a record
- In My portfolio, select New account.
- Enter the name, address and useful phone numbers.
- Add opening hours and notes such as access instructions or the person to meet.
- Set the priority and desired visit frequency.
- Save the record.
A visit duration of 0 means “use the usual duration from My account”. Another value sets a duration specifically for this professional.
Do not suggest visits keeps the record but excludes it from automatic proposals. A record’s commercial owner is an organisational label; it does not grant access to your workspace.
Import with a preview
CSV file → preview → read the log → confirm → import. Previewing changes no accounts.
- Choose Import CSV, then your file (up to 3,000 accounts and 10 MB).
- Choose an import mode and select Preview without changing my data.
- Review additions, updates, skipped rows and cases needing review. The table shows the first 100 rows; scroll it horizontally on a phone. Download .xls log provides all rows in a real Excel file, with a second sheet for groups.
- Names are compared without accents, case, common titles or first/last name order. Addresses must match after normalising case, accents and punctuation. This does not prove professional identity; check namesakes. Separate Last name and First name columns are accepted, as is the usual full-name column.
- Select Confirm and import and confirm if the preview is correct. A full recovery copy is made first. If your portfolio has changed since the preview, run it again.
| Mode | Result |
|---|---|
| Add new name and address combinations | Skips existing name/address pairs. A known name at a different address creates a new record. |
| Add unknown names only | Skips known names even at a different address. |
| Add and update unique matches | Updates a unique match and adds new names. Only supplied fields change; notes are appended. Ambiguous namesakes and grouped records require manual review. |
| Replace the entire active portfolio | Archives old records and loads the file. History remains available. Blocked while future appointments still use the portfolio. |
Exact duplicate rows are skipped after the first occurrence. Invalid rows must be corrected before previewing. Absence from a partial file does not prove an associate has left: possible arrivals and missing members are flagged without automatically changing groups. After import, use Detect accounts to group to review membership.
Retrieve the latest portfolio backup downloads the copy made before the latest grouping or import operation. To roll back, choose Import a backup and the related categories; review the preview before confirming.
Group professionals at the same address
Detection processes only accounts whose Grouped account box is not checked. After confirmation, they therefore disappear from suggestions. Already-grouped accounts are not suggested automatically, even if another professional arrives at the same address. Records are preserved. To deliberately manage an existing group, select Show completed groups. A new suggestion requires at least two ungrouped accounts at the same address.
Detect → select members → check the name → Yes or No.
In your portfolio, select Detect accounts to group. Detection compares street number, street, postcode, town and country; practice or postbox details may differ. Incomplete addresses still use full-text comparison. Review members before confirming. To add to an existing group, use Show completed groups, select members and update the group. Individual addresses remain unchanged.
Select members and check the shared name, such as “Dr Pierre, Dr Paul, Dr Jacques”. If the list of names exceeds 200 characters, a short “Group of N professionals” name is suggested; you can customize it. All members are preserved. Entered names must contain between 1 and 200 characters. Creation errors appear directly in the affected suggestion. No, skip changes nothing; Yes, create this group asks for confirmation.
Created suggestions disappear immediately; choices in other suggestions remain unchanged. No, skip hides a suggestion during this detection session without changing data. It can appear again when detection is reopened.
To process the list together, review names and members, then click Create all remaining groups. One shared confirmation is required. Only new suggestions still displayed are processed; existing groups and skipped suggestions are excluded. Progress is shown as each group is created. If an error occurs, successful groups are preserved and processing stops: correct the remaining suggestion before retrying. If the portfolio changed concurrently, close and reopen detection first.
The new record uses the shared address. Individual records stay in your portfolio, marked Grouped account and excluded from visits. Their notes are preserved and the requested French note is appended: “Compte regroupé avec autre(s) professionnel(s) à la même adresse”. The shared record is also marked Grouped account. Initial duration follows the average visit duration; opening hours are the intersection of members’ hours. Resolve incompatible hours before grouping. Existing appointments are unchanged: review them to avoid duplicate visits.
The same button lets you add or remove associates by changing the checkboxes. Removed members regain their previous visit setting; their notes remain. Choose Dissolve this group when it is no longer useful: members regain their previous visit setting and the shared record is archived. Cancel the shared record’s future appointments first. Remove a member from the group before changing its address or deleting it.
The CSV Grouped account column retains the checkbox only. Use a full JSON backup to preserve links between shared records and members.
Keeping notes when grouping accounts
From version 1.3.3: the grouping mention appears before the complete original notes. The shared account copies notes under each member’s name and retains its own notes during updates. In View, Grouped accounts’ notes also shows current individual notes, including those belonging to older groups. No text is automatically deleted. If the 100,000-character limit is exceeded, grouping is refused without changes.
Read reports within an account
From version 1.3.2: in the portfolio, click View (or double-click the account) to open read-only details. Visit reports, before administrative details, lists visits and field exchanges newest first. It shows the date, entered time, duration and full comment; contact person, outcome and next action appear when available. Calls and unsuccessful visits retain their labels. Visits without comments are identified. Duplicates from the same field entry are combined; different comments remain available. Use Edit explicitly to change account data.
Next visit dates — 1.3.1
The Next visit column and account details show the date and, when available, time. The application first uses the earliest upcoming calendar appointment (Fixed appointment if confirmed, otherwise Scheduled visit), then the agreed Approximate date, then the Usual due date calculated from the last visit and usual interval. Otherwise it shows No date set. Usual and approximate due dates do not reserve an appointment.
Filter by next visit type, Overdue, With a date or No date set. Next visit from and Next visit until include both boundaries; an empty boundary leaves that side open. Date ranges exclude undated accounts. Combine these filters with city, priority and other criteria. Next visit sorting uses the displayed date and keeps undated accounts last. Selecting filtered accounts covers every page.
If server unavailability interrupts grouping, close the dialog and run detection again to check saved groups before continuing. Writes are never automatically replayed.
Filter and select
Use the name, town, priority or Visit filter to narrow the list. Hiding filters does not clear their criteria. Deselect all clears the entire selection, including accounts hidden by a filter; it does not delete records.
Account details — version 0.30.13
In the portfolio, View details or a double-click on the row opens a read-only record: address, contact details, owner, priorities and hours, full notes, latest visit with known time, appointments, completed visits and exchanges. Selection checkboxes keep their existing role. Edit in the record explicitly opens the existing form; Close returns to the list. Viewing sends no write request. Notes and names are displayed as text, without executing HTML.
Navigation and viewing — version 0.30.13, 2 October 2026
The My account leave warning compares actual changed values against saved settings. Address searches, simply opening details, reverting a value or restoring an identical draft no longer trigger a warning; genuinely different drafts remain protected. Administrative/legal search starts collapsed: use Search administrative and legal information when needed. Closing cancels pending requests. Account and place details open read-only; Edit opens the fields. Existing legal fields are retained when search is collapsed.
Account selection: rules verified on 2 October 2026
Two workflows. Prospecting through Fill my day starts from an address/GPS point, radius and time window. Commercial follow-up through Plan my routes uses the portfolio and date horizon, with automatic or manual selection. The engine uses deterministic rules, not AI analysis. The following weights are not percentages.
#### Prospecting within an area
The radius uses straight-line Haversine distance; route construction then uses available road travel data. It excludes accounts marked Do not visit, missing usable coordinates, outside the radius, already scheduled in the active calendar, or not yet due. An account visited on the same day is excluded. A pending Call action excludes it; a Visit again from action replaces the usual due date. Opening hours and the selected time window still apply.
This workflow uses Minimum distance: priority and commercial interest receive no bonus, while overdue days still count. It is neither strictly nearest-first nor restricted to never-visited accounts: both new accounts and previously visited accounts that are due can be proposed. Existing appointments remain protected when filling part of a day.
#### Commercial follow-up over a date horizon
Automatic selection normally uses latest visit + frequency in days. Latest visit means the most recent declared/imported date or completed visit; a merely scheduled appointment is not a completed visit. Recorded time is displayed but recurrence uses dates. An account without history is due at the horizon start. A Visit again action or availability resumption may adjust the due date; a pending Call action removes the account from automatic visit selection.
Manual selection uses the checked accounts and makes them eligible from the horizon start, even before their usual recurrence. Location, opening hours, unavailability and travel constraints remain; Do not visit accounts are rejected. Manually selected accounts are proposed at most once over the horizon; automatic selection can repeat them after their interval. List filters alone do not restrict automatic planning: use Select filtered accounts, then Plan selection, to enforce that subset.
#### Combining criteria
| Mode | Travel cost | Priority bonus | Interest bonus | Overdue bonus |
|---|---|---|---|---|
| Balance business and travel | minutes to the next account | 12 × priority (1–5) | 8 × interest (1–5) | 10 × overdue days |
| Minimum travel time | minutes | none | none | 10 × overdue days |
| Minimum distance | kilometres | none | none | 10 × overdue days |
At each step the score is travel cost minus these bonuses; lower scores win. A one-point priority increase contributes 12 points and an interest increase contributes 8 in balanced mode. All else equal, a 30-minute trip with priority/interest 5/5 scores −70, versus −10 for a 10-minute trip with 1/1: the longer trip can win.
Before comparing scores, the engine prefers consecutive visits at the same address, then returns within the desired time rather than requiring overtime tolerance. Account ID breaks final ties. Grouped candidates receive a small 0.01-per-member bonus and use the maximum member priority/interest. Proximity is recalculated from the current position after each stop, not just from departure.
Time constraints take precedence: visit duration, opening/closing, preferred time and tolerance, lunch, fixed appointments, latest return, working days, leave and unavailable periods. General simulation is separate from the calendar and does not globally remove all already-scheduled accounts as prospecting does. Review transfer conflicts. Unplaced accounts are reported. The engine builds routes step by step and refines road travel estimates; it guarantees neither a global optimum nor live traffic handling. This change does not alter selection rules or weights.
Prepare your first tour
My horizon layout — 1.3.2
Controls have a consistent height. Dates and durations align; help text sits below the fields and the start time uses a compact field. Pairs become a single column on the smallest screens. Values and planning rules are unchanged.
- Open Plan my tours and choose the dates to prepare. The default start date is the first working day from tomorrow. Also choose the Planning start time, which defaults to your usual work start. This sets the earliest departure on the selected first day; later days follow your usual hours. Choosing a time before work starts does not move your working day earlier.
- Let the application suggest accounts or use your selection.
- Start the calculation. If asked about grouping accounts at the same address, choose what suits your work.
- Review appointment times, journeys, lunch and return. Also check accounts that could not be scheduled.
- If the proposal suits you, use the transfer to calendar action.
- Choose to add appointments or replace those in the period, then read the summary before confirming.
Grouping example: three accounts at the same address can share a usual 45-minute slot, with 15 minutes each. A customised visit duration stays specific to that account.
Travel times do not include live traffic. Take extra care with estimated journeys. Check the professional’s availability: an application proposal is not confirmation from them.
Choose the simulation duration
The Average visit · min field under My horizon accepts 5–480 minutes. It starts with the My account default on sign-in. Your chosen value applies to the simulation and is preserved when saving and loading it. Existing appointments and the My account default are unchanged. An account-specific visit duration still takes priority.
Use your calendar each day
Clear a calendar date range
In My calendar → Clear calendar, optionally enter dates and select Review date range. Both dates are inclusive: two dates clear that range; empty start clears through the given end; empty end clears from the given start onward; both empty clear the entire current calendar. An end before the start is rejected. The appointment count is shown before Confirm clearing.
Fixed and confirmed appointments and cancelled calendar entries in the range are included. Completed visits remain in visit history; accounts, day settings, leave, simulations and archives are retained. An automatic date-range archive is created before deletion and can be viewed using calendar sources. Changing dates invalidates the preview; if the calendar changes before confirmation, review it again. This explicit user action is separate from upgrades, which must never erase data.
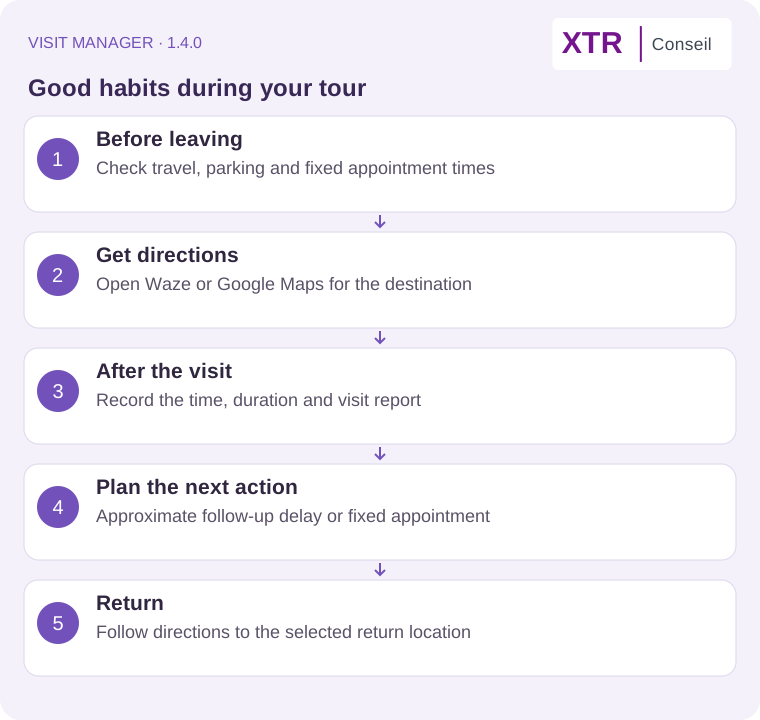
Choose Day, Week or Month. On a phone, swipe weeks horizontally. Check the selected source: Current calendar to work on your appointments; simulation or archive to view another version.
Double-click an appointment on a computer, or tap it on a phone. Choose the appropriate status:
- Planned: the visit is scheduled, without confirmation from the professional.
- Confirmed by account: the professional accepted the appointment.
- Completed: enter the actual duration and visit report.
- Absent / to reschedule: report the unavailability and follow the proposed rescheduling steps.
- Cancelled: remove this appointment from the schedule after confirming.
A past visit is never marked “Completed” automatically. Take a moment at the end of the day to record outcomes. You cannot mark a future visit as completed.
Reserve a personal or professional time slot
Double-click a day in the calendar, then select Add a fixed appointment. Enter the title, times and place, then save. Recalculate the affected tour afterwards. The calculation will not move this slot; it must fit within working hours and remain compatible with lunch.
Direct visit recording — version 0.30.13
The latest visit date and, when known, time appear in the account list, edit form and practice follow-up as well as when selecting an account to record a visit. A newer declared date never borrows the time of an older recorded visit. Visits without a time display their date only.
The portfolio Record a visit button opens the form at the top of History and visits. Search with at least two name characters (accents ignored), choose an account and its address, then enter date, time and comment. All portfolio accounts are available, including those excluded from proposals. The usual duration is prefilled in the options. Replacing a visit for the same account on the same day requires confirmation.
The microphone button uses browser speech recognition in FR/EN. Review and edit the text before saving; Visit Manager stores no audio file. The browser speech provider may process audio. If unsupported or denied, use typing or the keyboard microphone. Dictation stops when hiding the page, changing section/language or signing out. Real phone dictation still needs validation; browser tests simulate the speech service.
Open on today
My calendar opens on the device’s current date, including when returning after midnight. You can navigate freely to another period. Restoring a saved simulation no longer changes this date; explicitly opening that simulation retains its own period.
Clear a period with confirmation
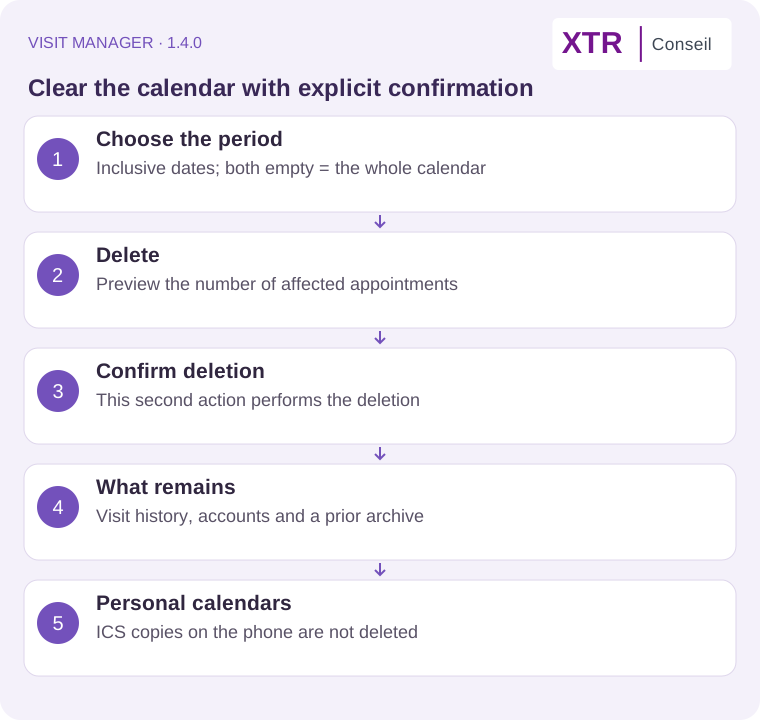
Select an inclusive date range. Empty start: from the first appointment; empty end: through the last; both empty: the whole calendar. Delete first displays the number of affected appointments. Only Confirm deletion performs the write. Changing dates invalidates the confirmation; closing cancels.
A prior archive and completed-visit history are retained. This affects Visit Manager only: existing ICS copies in personal calendars are not deleted. Google/iCloud/Microsoft 365 two-way connectors are not active.
Find a replacement visit
If a visit becomes impossible, open its appointment in My calendar, then select Find a nearby appointment. The same button at the top of the calendar lets you add a visit without replacing another one.
Find an appointment right now
- Allow your phone or computer to access your location (see chapter 13).
- Choose a distance in kilometres or a road travel time in h:mm, such as 0:20 for 20 minutes.
- Select Search from my location.
Search starts from your location and the current time, today, within today’s tour. There is no date or time to enter. The visit starts after travel, the preparation buffer and, if needed, the account’s opening time. The server checks the time again when you confirm: if the slot has changed, run the search again.
Understand the two steps
Accounts without a planned visit → no suitable result → your agreement → planned appointments → your confirmation → calendar updated.
The first search excludes all accounts with an active visit in the current calendar. If no result matches the displayed criteria, a question offers to search planned appointments. Select Yes, search planned appointments only if you want this second search. It offers to bring a later visit forward; the original date and time are displayed.
Confirm the change
- Read the proposed times and contact the professional to check availability.
- Select Schedule this appointment or Bring this appointment forward.
- Check the summary, then confirm. Cancelling leaves your calendar unchanged.
After confirmation, the original slot of the appointment brought forward is freed and the visit is scheduled at its new time, keeping its duration. If you started from an unavailable visit, that visit is marked absent and retained in history. The new appointment has planned status: confirm it with the professional. Other appointments keep their times.
A calendar backup is made before the change. If the calendar or calculation has changed, rescheduling is refused and appointments stay in place: run the search again.
No estimated delay means the calculation respects later appointments, lunch and return time. It guarantees neither clear roads nor the professional’s availability. Only suggestions without an impact and with verified routes can be applied. Clear Only with no estimated delay to inspect other suggestions and their impacts.
Search respects opening hours and checks at most the 20 nearest accounts in each step. Accounts without coordinates cannot be suggested. A tour must exist in your calendar today. Diagnostics explain accounts excluded because of closing time and unverified routes.
Read the map and show charging stations
In My map, choose the accounts to display, the date and the tour source. Tap a marker for details. Tour accounts retain visible appointment times; other accounts may appear grey.
- A house represents a home; a building represents an office.
- A star represents a priority account.
- A charger with a plug and lightning symbol represents a public charging station.
- Dotted journey lines are indicative: the road route could not be obtained.
Show my location adds a blue dot and an accuracy circle. Hide my location removes them.
Enable Show charging stations. Search covers the bounding rectangle of displayed accounts, with a 10 km margin. Account filters automatically update this area; moving or zooming the map does not change it. Fit charging stations helps you find the markers. Partial results are flagged. Check hours and connectors: a displayed station is not necessarily open or free.
Show my location enables automatic tracking; the button turns green. The dot and accuracy follow browser location updates. Hide my location, signing out or leaving the page stops tracking. Keep the page active: the browser may pause updates in the background.
Download an A4 tour-sheet PDF
- In My calendar, select the tour source you want.
- Select Print tours.
- Choose the dates, then Download PDF or Open PDF to print.
- For a busy day, select the short-notes option.
Busy days automatically use a compact layout: times on one line, reduced spacing and grouped contact details. Information is retained within the selected note limit, with a minimum font size of 7 points.
Each day uses one A4 page: date, appointments, addresses, available phone numbers, notes, journeys and a summary. The summary gives appointment count, total travel time and distance, including the return.
Shortened notes are marked “excerpt”; the full text remains in the account record. If the day cannot fit legibly on one page, no document is produced: try short notes. For archived tours, contact details come from the current portfolio.
On a phone, open the downloaded PDF and use your device’s share or print menu.
Keep your data
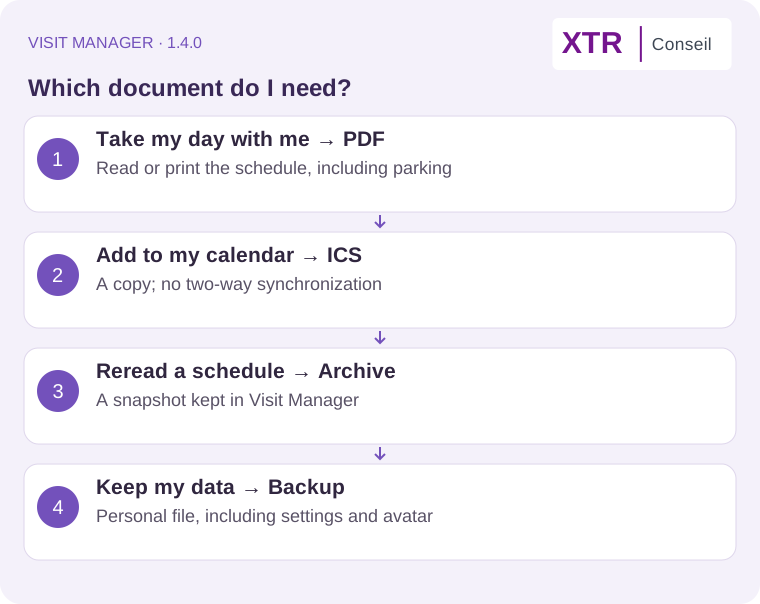
These are three different purposes:
- PDF: take or print a day’s plan. It cannot restore your data.
- Save this calendar: retain a snapshot of a period’s schedule to view in the application.
- Export my data, under My account → Back up and restore my data: download a personal backup. Store it somewhere private.
To restore a backup, choose Import a backup, select categories, then use Check before restoring. Read the summary before confirming: selected categories will be replaced, even if empty in the file. Another user’s backup is not accepted.
The .ics format exchanges appointments with a calendar. Import previews fixed appointments; verify their locations before confirming. Export is not synchronisation: changing an event in another calendar does not automatically update Visit Manager.
If something does not work
- An address will not validate: select a suggestion, then check the street number and town. If the location remains uncertain, do not rely on the proposed journey.
- No nearby appointment: check today’s tour, location permission, account coordinates and radius. Opening hours must allow the whole visit. If no account without a planned visit fits, you can agree to search planned appointments.
- No charging stations: check the display checkbox and search area, then search again. An unavailable-source message means the service did not respond.
- An account is missing from the map: check the filters and the geolocated address in its record.
- A new feature is missing: refresh the page. An improvement in preparation may not yet be online.
- Import or export is unavailable: check your access; some features are limited during a trial.
Need help? Contact xtr-conseil@orange.fr with the section, the action you took and the exact message. Never send your password.
Remove an account from your portfolio
- Open its record in My portfolio.
- Select Delete this account.
- Read the message and confirm, or cancel to keep the record.
The account disappears from the portfolio and new proposals. Past visits and history remain available. If an appointment is scheduled today or later, cancel it in the calendar before removing the account. Regenerate older simulations that contain it.
Allow location access
You need two permissions: your device must allow the browser to use location, and the browser must allow Visit Manager. Menu names may vary by version. Allow the site you use: https://visit-manager.fr.
Start in Visit Manager
- Open My map and enable Show my location, or use Find an appointment and Search from my location.
- Choose Allow when prompted.
- If nothing happens, follow the device steps below, reload Visit Manager and try again.
Mac: allow access on the device
Open Apple menu → System Settings → Privacy & Security → Location Services. Enable the service and your browser if listed. Older macOS versions use System Preferences. Then check your browser below.
Windows PC: allow access on the device
On Windows 11, open Settings → Privacy & security → Location. Enable location services and the available app access permissions, including desktop apps if shown. On Windows 10, look under Settings → Privacy → Location. A company-managed device may require help from your IT team.
Safari on Mac
- Open Visit Manager in Safari.
- Choose Safari → Settings → Websites → Location and set visit-manager.fr to Allow.
- Reload the page and retry. Safari is not offered as a current Windows browser.
Chrome on PC or Mac
Open Visit Manager. Click the site controls icon to the left of the address, then Site settings → Location → Allow. Reload the page. You can also search for “location” in Chrome settings and check that the site is not blocked.
Edge on PC or Mac
Open Visit Manager. Click the information or lock icon beside the address, then Permissions for this site. Set Location to Allow and reload. Alternatively, open Edge settings → privacy, search and services → site permissions → all permissions → location.
Firefox on PC or Mac
Search Firefox settings for “location”. Open Settings beside Location in the permissions section. Remove the block for visit-manager.fr and make sure new location requests are not blocked. Return to Visit Manager, retry and accept the prompt. The permissions icon beside the address also lets you clear an earlier decision.
Safari on iPhone or iPad
- Open Settings → Privacy & Security → Location Services and turn the service on.
- Choose Safari Websites, allow access while using and enable Precise Location if offered.
- In Safari, open Visit Manager. Use the page menu beside the address, then … if needed, to open Website Settings and allow location.
- Reload and retry. The page menu icon varies by iOS version.
Firefox, Chrome or Edge on iPhone or iPad
In the same iOS location settings, select Firefox, Chrome or Edge. Allow access while using and precise location if offered. Return to Visit Manager and also accept the website prompt. If the browser is not listed yet, first request your location in Visit Manager. These browsers have different menus on iOS and Android.
Chrome on Android
- Enable Location in your phone settings.
- Open Apps → Chrome → Permissions → Location. Allow access while using and precise location if offered.
- In Chrome, open ⋮ → Settings → Site settings → Location and allow requests. If visit-manager.fr is blocked, change its permission.
- Return to Visit Manager, reload, retry and accept the prompt.
Firefox, Edge, Samsung Internet, Brave and Opera on Android
Enable phone location and allow your browser to use it under Settings → Apps → browser name → Permissions. Then open Visit Manager and accept its request. If you previously denied access, look for “location” or “site permissions” in the browser settings and remove the block for visit-manager.fr. Menu names and locations vary by browser and phone. Brave and Opera on computers follow the same principle: system permission, then website permission.
Check the result
A marker appears on the map when a position is available. While location display is enabled, the app receives updates supplied by the browser. Frequency and accuracy depend on your device; updates may stop when the screen is locked or the app is in the background.
If the position is far away, check precise location on your phone. On a computer, keep Wi-Fi enabled: nearby networks may help estimate your position. Permission alone does not guarantee GPS accuracy. A correct position does not make every account eligible: its address must be located and its opening hours must allow the visit.
Official help
Apple: location on iPhone and iPad. Google: Chrome location permissions. Microsoft: location in Edge. Mozilla: location in Firefox. Mozilla: Firefox for iOS permissions.
Export a tour to your calendar (.ics)
An .ics file copies your tour schedule into a calendar such as Outlook, Google Calendar or Apple Calendar. You can then see tour time slots alongside your other appointments. It is not a full Visit Manager backup.
Download the file
Under Export a period as .ics, the From, To fields and the export button are aligned. On a phone, the button sits below the dates and spans the full width.
- Open My calendar.
- Select the source: Current calendar, Simulation calendar or an available archive. Choose the current calendar for your saved schedule. A simulation is still a proposal: exporting it does not transfer it into your Visit Manager calendar.
- Find Export a period as .ics.
- Set the From and To dates, for example Monday through Friday of your tour.
- Select Export this period as ICS.
- Find the file in your browser downloads. Its name contains the selected dates, for example
visit-manager-2026-09-21-2026-09-25.ics.
If you see “No tour in this horizon”, check the selected source and dates. A period can cover up to 367 days inclusive.
What does the export contain?
It includes events from tour days present in the selected source: visits, fixed appointments and, where scheduled, journeys, lunch breaks, departure and return. Available titles, times and locations are included. Routing information and appointment status are also provided; their display depends on the receiving calendar.
Times are based on Europe/Paris. Your calendar may display them in another time zone: check this if times seem shifted. Phone numbers and detailed notes are not included; use the PDF tour sheet to take those details with you.
Add the file to a calendar
For a simple start, create a separate calendar called Visit Manager tours, and select it when importing. This makes your tours easier to distinguish from personal appointments.
- Apple Calendar on Mac: open Calendar, select File → Import, choose the
.icsfile and the destination calendar. Apple help. - Google Calendar on a computer: open settings, then Import & export. Select the
.icsfile and destination calendar, then import. Import is done on a computer. Google help. - Outlook on the web: open Calendar, then Add calendar → Upload from file. Choose the file and destination calendar, then import. Labels may vary by version. Microsoft help.
On a phone, opening an .ics file depends on the installed app. If no import option appears, import on a computer into the calendar for the same account used on your phone, with calendar synchronisation enabled.
After changing your schedule
An export is a snapshot, not synchronisation. Changes or cancellations in Visit Manager do not automatically update imported copies. Moving an event in Outlook, Google Calendar or Apple Calendar does not update Visit Manager either. Exporting does not send invitations to your contacts or confirm appointments with them.
Before importing a changed period again, check existing events: another import may create duplicates, depending on the receiving calendar. In the separate calendar, remove only the old imported copies for that period if needed, then import the new export. Keep personal appointments and other periods.
Import an .ics calendar in Visit Manager is a different feature: it previews fixed appointments to add. It does not restore an exported tour exactly. Use the personal backup described in chapter 10 to recover all your data.
View an invoice preview
In My account, enter and save your billing details, then select Invoice preview. An HTML file downloads: open it in your browser to view or print it. It uses the Visit Manager logo, colours and presentation, with your details and selected billing period.
This preview is not an issued invoice. Amounts and VAT still need configuration; no payment is triggered.
Try 100 demonstration accounts
Full backup → confirmation → experiments → exit demo → data restored.
- In the portfolio, select Demo mode · 100 accounts.
- Read the warning: your working data will be replaced during the demo. Select Download full backup and save the JSON file privately. It includes settings and places, identity, portfolio, calendar, history, simulations, drafts and exportable billing data. Passwords, licences and sessions are not exported; they remain on your account.
- Check I have saved my full backup in a safe place, select Replace my data with the demo, then confirm. Download a fresh backup if your data have changed in the meantime.
- The DEMO ACTIVE banner stays visible. All 100 professionals are fictional, in Paris and its southern suburbs. Street addresses are illustrative and coordinates approximate. The Palaiseau home address is fictional: do not use these records for real visits. Several accounts share an address to test grouping.
- Select Exit demo and restore my data. After confirmation, demo experiments are erased and previous working data, including drafts, are restored from the retained copy. Login access and real billing were never replaced.
The recovery copy survives logout or restart: sign in again and exit demo. Keep your downloaded file for manual recovery through Import a backup. Demo mode requires a licence allowing full backups; it is unavailable during the limited trial.
Choose walking
A day on foot
- Open My agenda, choose the date, then tap Set up this day. On a computer, you can also double-click the day's heading.
- Under Travel mode, choose Walking. Car remains the default.
- Save. The mode covers departure, every journey between visits and lunch, and the return to your chosen place.
- Check the times. If you changed only the mode, appointments keep their times. A warning appears if journeys no longer fit: use Recalculate journeys and, if needed, rearrange appointments.
Before a new simulation, set the mode for the relevant days. Walking durations come from IGN when available; otherwise an estimate at 5 km/h is shown. Check the route and allow time for your walking pace. PDF sheets and exports include the mode. Public transport is not offered.
My route and field follow-up
On a phone, My route opens after sign-in. On a computer or tablet, choose My route from the menu. It always shows today’s current calendar, even if you were viewing a simulation. Use Close to return to other features.
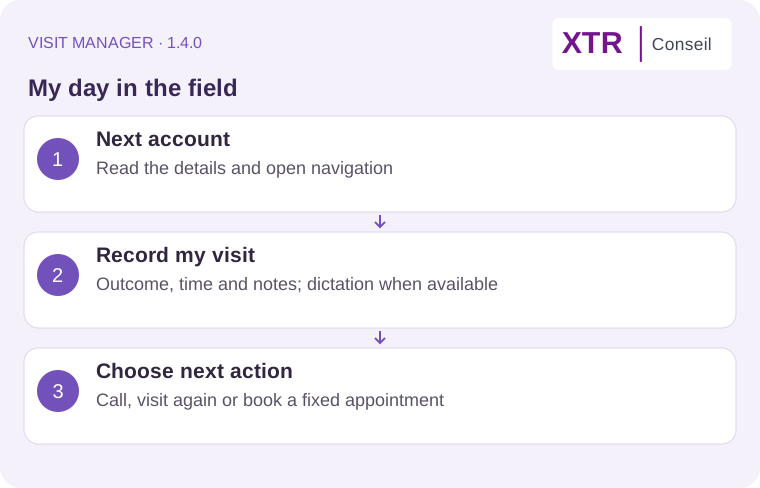
- Look at the next practice. A Suggested drop-in has a proposed route time; a Confirmed appointment has an agreed time. The next protected appointment time stays visible.
- Tap Navigate to open directions, or Call to contact the practice. Your phone may ask you to confirm the call.
- Afterwards, tap Record my visit. Choose: practice closed/no one available, introduction at reception, conversation with a professional, or project identified.
- Choose No next action, Call, or Visit again, with a date. Visit again sets the earliest date for suggesting a visit; it does not reserve an appointment time. Tomorrow is suggested by default.
- Tap Save report. The next remaining visit becomes visible. Under Add details, you can record the contact, a note and the actual duration (10 minutes suggested; adjust when needed).
Example: you introduce yourself at reception on Monday, and a project should be discussed on Thursday. Choose Introduction at reception, then Visit again on Thursday. From Thursday, the practice can be suggested despite the recent introduction, subject to opening hours and route constraints. A visit already completed today is not automatically suggested again today.
A closed practice is kept in the attempt history, without counting as a completed visit. The other three outcomes count as completed visits. Existing account notes remain unchanged. To record an unplanned visit, open My practices → Practice follow-up.
Due calls appear under Calls to make. After calling, use Record the call to record the outcome and next action without counting a visit. Accounts awaiting a call are excluded from automatic prospecting, but remain available for manual selection.
For an agreed appointment, open Practice follow-up → Book an appointment, enter the date, time and duration, and confirm that the practice accepted the time. The application checks opening hours, working days, existing visits, lunch and the return journey. Conflicts are rejected without moving existing appointments. The account must have a located address. This action cannot replace a confirmed or completed visit for the same account on that day.
Plan my prospecting opens the time-window, departure and return choices. Find a nearby practice opens the existing immediate replacement search. View the whole day expands journeys, breaks, other visits and routing accuracy details. Reporting does not automatically recalculate the route; confirmed appointment times remain unchanged.
Reports and next actions are included in the complete backup with the portfolio. CSV export alone is not a replacement for a full backup. Only one completed visit per account per day is recorded; calls can be recorded separately.
An empty day shows one message with Plan my prospecting, My practices and Find a nearby practice. View the whole day appears when there are events to read. Actions stack vertically on phones.
Next visit — available in 1.3.0. Choose After an approximate delay (“let’s meet again in 3 months”, weeks or months, 6 months offered), On a fixed date, or Do not plan now. The delay applies only to the next visit: it sets a due date without reserving a slot or changing the usual frequency. A specific date requires time and duration and uses the displayed account address. Mark phone or verbal agreements using Confirm appointment in the calendar: time and location become fixed. Other visits are planned around them, even when the account is not selected. The portfolio Confirmed appointments filter shows accounts with or without an upcoming fixed appointment. On conflict, inputs remain and neither the completed visit nor its follow-up is saved.
Fill a free window
Available in version 1.2.0: full place selection, consecutive-visit fix and ICS export from the proposal.
- From My calendar → Fill my day or My route → Plan my prospecting, choose the day, start and end. The next working day is suggested; times follow Europe/Paris. The start must still be in the future.
- Choose Driving or Walking; your usual mode is preselected. Cycling and public transport remain unavailable.
- Choose a saved place, My current location or Enter an address for departure.
- For Return location, choose Same place as departure, a saved place, GPS or a separate address. Return travel must fit within the hours.
- Each address search suggests IGN/BAN results after three characters and a short pause; Enter and Search for this place remain available. Select a suggestion to show its full address. Editing text requires selecting again. Searches are independent. GPS is requested during calculation only if selected; allow it in the browser. One reading is used when both ends use GPS.
- Enter a straight-line radius around departure, then Suggest visits. Accounts must be located, allowed, due and without an already planned appointment. Duration, opening times, lunch and return constrain selection.
- Review departure/return, visits, times, distances and travel duration. Existing visits keep their times, including consecutive visits at the same address. Estimates are labelled when routing is unavailable; no live traffic.
- Add these visits to my calendar confirms addition after an automatic archive. Closing without adding leaves the calendar unchanged. Expired (fifteen minutes), stale or already-started proposals must be recalculated.
- Export the day as ICS downloads the proposed day, including existing appointments and journeys, without adding it to Visit Manager. After adding, it exports the saved day. Open the file in your computer or phone calendar. Share the ICS file appears after download when file sharing is supported; otherwise use the downloaded file. This is not automatic synchronization and does not send files to a remote phone. Check for duplicates in the receiving calendar before importing again.
For a partial window, outside appointments stay protected. The existing day’s departure, return and mode are retained; the requested point is only the search centre. The preview explains this. Day travel can extend outside the window; new visits stay inside it.
Changing the form clears the preview and associated actions. Accounts without coordinates must be located in the portfolio. Address queries go to IGN; selected points are kept in the proposal, then in the validated route, without changing saved places. Your existing export permissions still apply.
Manage my routing key
Under My account → OpenRouteService key, paste your key and choose Save or replace key. The field is cleared afterwards; only whether a key is saved is displayed. Enter a new key to replace it. Choose Delete key and confirm to remove it. The key is encrypted on the server and excluded from personal exports; restoring an export does not replace it. Saving is disabled until server encryption is configured. Saving does not check validity with OpenRouteService and does not yet enable cycling or public transport.
Public transport: the requested coverage is all of France, including timetables, transfers and walking to stops. This mode remains under preparation. An OpenRouteService key does not enable it; a public transport routing service must still be connected and its coverage verified.
Sauvegardes automatiques / Automatic backups (2026-10-11): scripts/backup_database.py est installé dans /usr/local/lib/visit-manager-backup.py pour le timer existant. Sauvegarde SQLite cohérente, contrôle d’intégrité, compression vérifiée par SHA-256 et conservation des 14 sauvegardes automatiques les plus récentes, tous formats confondus ; archives de livraison exclues. / scripts/backup_database.py is installed at /usr/local/lib/visit-manager-backup.py for the existing timer. Consistent SQLite backup, integrity validation, SHA-256 verified compression and retention of the latest 14 automatic backups across both formats; release archives are excluded. Tests temporaires de restauration, conservation après échec et rétention réussis / Temporary restoration, failure preservation and retention tests passed. Source précédente sauvegardée dans le dossier de livraison / Previous script retained in the release backup.
Try a broader word or clear the search.